Your Twitter feed is a busy place; with news updates, mentions and interactions, it can quickly become chaotic. Luckily, Twitter introduced Lists as the hidden gem of timeline organisation, making our lives as Twitter users a more organised form of chaos.
Twitter lists are simply a collection of curated Twitter accounts, where users are able to categorise other users into groups, and view their tweets on separate timelines. From a business perspective, Twitter lists can be a beneficial tool for a variety of reasons. These personalised lists can be used to connect with industry leaders, keep up to date with the latest trends and monitor competitors. Taking little time to create, you have the ability to categorise your followers into your client base, industry leaders or even by business sector. Twitter lists can save you a great deal of time when looking for specific information from your followers, or when searching for more information on specific trends.
Creating a Twitter List:
1. To begin creating your new list, click ‘Lists’ at the top of your profile page, then ‘Create new list’ in the side bar.

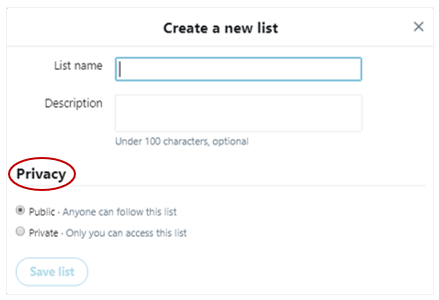
2. Next you should provide a title for your list. To do so, click in the box to add the title and description. This is where you have the option to select the privacy settings for your list. By default, lists are public, however you can make them private by clicking ‘Private’.

3. When this is complete, click ‘Save List’, then you can begin adding accounts to your list.
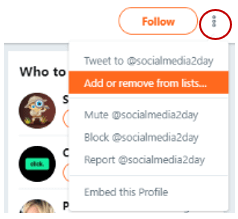
4. To add an account to your list, click on the three arrows next to the ‘Follow’ button on the account you want to add.
5. When the dropdown menu appears, click ‘Add or remove from lists’.

6. Click on the List you would like to add the account to, and your choice will automatically be saved. To remove an account from a list, simply untick the box.
Have you tried using Lists? Let us know in the comments below how you categorise your Twitter timeline.


